Showing posts with label DIY tips. Show all posts

3.31.2012

DIY Easter Basket

As Easter approaches, all the sudden, I realized that our sweet baby girl didn't have an Easter basket.  So off to Pottery Barn Kid's website I went searching.  Well they are super cute, but what I was willing to spend only got us the personalized liner....yeah.  Not in the budget.  So the DIY-er and budget-crazy side of me got to thinking.  I was pretty sure I had all the supplies I needed at home to create a super cute Easter basket for Adeline that she could treasure for years to come.

My sewing machine has been giving me a lot of trouble lately...and thanks to my grandma and me putting our heads together, we finally found a way to work through the kinks it was giving me.  This opened up a whole new door of possibilities!

The main detail I wanted to have for her Easter basket was for it to be personalized with her name.  At first, I had no idea how I was going to pull that part off.  Oh, but I found a way!

Adeline was given a basket full of goodies after she was born from one of her great aunts in a pretty, pink basket.  I decided to re-purpose it for her Easter basket!


The other materials I had on hand to use were:

-pink material
-buttons
-a monogrammed hand-me-down t-shirt


The hand-me-down was a t-shirt that was a 2T that I honestly wasn't crazy about but was very thankful to receive.  I was so excited to be able to use it to re-purpose it!

I cut out the monogram from the t-shirt, sewed it onto the material I had, and created a few cutesy rosettes.


With a little bit of time at the sewing machine and some hot glue gun work...Adeline's Easter basket is now ready for her first Easter!


Pin It!

1.20.2011

DIY--distressed furniture

I love the distressed paint look on furniture.  I guess it's the love for country decor in me.  Maybe? Whatever it is, I had to attempt my own distressed furniture project.  This little table that I bought at a local flea market for around $20 was the perfect candidate for my first attempt!


The first step was to sand the table to prep it for painting.  (I used hubby's sander.)  I decided to leave the top of the table the original finish and just paint the legs.


To get into small crevices I used sandpaper.


After sanding, wipe the furniture down to get rid of the dust before painting.


I used a medium base paint (a very light tan) to paint the table.  It will take a couple coats.


Once the paint is dry, to distress, sand various, random places where normal ware and tear would occur to the furniture.  For example, the edges of the legs are places where you usually see the paint worn down on furniture.  (Do this step until you have distressed the furniture to your liking.)


Next time I may distress more on the flat surfaces.  However, I was pretty happy with the finished project! (Actually my idea was for re-sale and we ended up keeping it in our living room!)


So is distressed furniture one of your likes among home decor? Have you ever distressed furniture?

Pin It!

1.16.2011

are you sitting down?

via
I finally broke out my sewing machine!! Oh yes.  That's what a three day weekend can motivate you to do! I'm excited to say that I actually used my sewing machine for the first time this weekend and even created something I love!

After a little lot of perseverance getting the machine ready to sew and ripping out a stitch or two lots of stitches, I finally had a breakthrough and had success with my first time sewing!

DIY Potholder Mini Makeup Bag

I started with a potholder.
(You can find them cheap at Wal-Mart for less than $2 for a two-pack.)


 I folded it in half and stitched up both sides with a zig-zag stitch.


I added a button that was left over from a piece of clothing.
(You know those extra ones you get and hardly ever use.)

And there you have it.  It's working beautifully to hold my lip stuff together in one place in my purse!

I'm so excited.  And I'm pretty sure I've caught the sewing bug!

So, do you sew? If "sew", what was your first project? Your favorite project?

Pin It!

9.08.2010

storage DIY

We have this little nook between our living room and kitchen that is a perfect spot for this chrome shelving we bought from Target.  However, it stands out as an eyesore when it stashes our soft drinks and Justin's lunchbox.  So a three-day weekend this past weekend led to a DIY project with some materials I had around the house.


Remember my DIY curtain project I posted about here? I had some canvas material left over and thought it would make the perfect material to create panels that would cover the bottom of the shelving.

The materials:  canvas material, velcro, Heat-n-Bond, measurements, and an iron.  I talked about the amazing Heat-n-Bond in my curtain post mentioned above.  It's simply wonderful! (Especially to those of you a little timid to sew like I am.)


I cut my three panels (one for the front of the shelves and one for each end) and then hemmed them using the Heat-n-Bond.


Next, I added the material to each of the three sides (adhesive side down).


And mid-project I discovered that my awesome velcro found on clearance at Wal-Mart only had one adhesive side (boo) which meant I would have to sew the velcro onto the panels.  Um, nope.  And since I am one that is a little OCD and must have a project completed once I start it (really, it drives me crazy to leave something unfinished), I found fabric glue in our office and glued the velcro to the panels.  (Adhesive would have worked better, but this worked well enough.)


And, finished.  (The wrinkles will fall out...they did beautifully in my curtains.)  I love how this pulls the little nook together, hides the uglies underneath, and allows us to conveniently lift each panel to pull out what we need from the shelf.

So how have you gotten clever with DIY storage in your house? Do share...I'm always up for another project idea!

Pin It!

8.08.2010

a sharp idea

When I did the file cabinet makeover using contact paper posted about here, a lovely reader gave me the idea of using some of the extra contact paper to make-over some office accessories.  What a sharp idea! A couple afternoons ago, I whipped up this little makeover for our pen and pencil holder.  (Mauve and green is good and all....but I just wasn't getting a good vibe from this accessory mixed with our freshly updated office.) 

So in about 5 minutes, I measured the length of the holder, cut the amount I needed, and slowly wrapped the holder while pulling the backing of the contact paper off as I went.


It's as simple as that! I still have some of this cute contact paper left.  Maybe I will cover Boone's crate in it next to match the rest of the office. ;)

Pin It!

6.16.2010

no sew curtains and a unique fabric choice

So this project has been a long time coming.  Our big front window in our living room has been in need of some curtain lovin' since we moved in and ripped down the ugly not-our-style curtains.  I am a little obsessed over some amazing DIY home improvement blogs.  This project is the outcome of inspiration found on two must-read blogs:  Young House Love (thanks to Sherry for the no-sew idea and inspiration) and The Lettered Cottage (thanks to Layla for the amazing curtain fabric idea).

Our big window looked something like this:


And now it looks like this:


Love, love the coziness and texture these curtains bring to our living room! (Sorry for the different lighting in the pictures...but you get the idea.)

So the fabric of choice?


Yes, that's right.  Canvas drop cloths from good ol' Wally World....one for each panel.

And how did I pull off this no-sew trick?


My handy, dandy ironing board, iron (oh was it happy to be used), and Heat-n-Bond ultra hold adhesive.  You can find this at Wal-Mart or Michael's...and I'm sure other places where craft supplies are sold.

My first step was to measure the length that I would need the curtains.  Because this window has the arched top, I couldn't hang them above the window to add even more drama so the window looked larger..I was only able to frame the outside of the windows to pull off the "bigger window" look.  I knew I wanted the curtains to sweep the floor so the length I ended up needing was 6 feet 10 inches.

I laid one drop cloth out on my floor, face down so that the seems were facing up.  I measured my length along the 9' side of the drop cloth so that the 6' width remained the same.  I measured about an inch and a half more than what I needed at the bottom (6 feet 12 1/2 inches to be exact) so that I would have room to add the adhesive, create my hemline, and still have the desired lenght when the hem was folded up.

Once I did that, I laid the drop cloth onto the ironing board with the cut part on the ironing board.


You'll want to follow the directions on the Heat-n-Bond but it worked for me to have my iron on medium setting when taking my first step of unrolling the adhesive along the edge of the cloth (below my mark for my length). You will slowly iron the adhesive (paper side up) onto the material (about 2 seconds per area).


Your next step is to let the adhesive cool and then slowly peel off the paper. Don't worry about ripping anything off..the entire paper part comes off while leaving the clear adhesive on the material.


Fold the "nasty/rough" edge up, creating your hem. Then iron (the cotton setting worked for me) along the flap that is folded over (material to material), about 8 seconds per area, to bond the adhesive. When it cools a little, go back and feel under the flap along the top cut edge to make sure no parts are left unattached. If you do find a part that didn't attach, just iron back over it.  This stuff works like magic and bonds the hem tightly...it's even washable!


Your hemline should look crisp and flawless like this...easy as pie!


Repeat these steps for your second drop cloth (second panel).

Choose the curtain rod of your personal preference.  However, here's the trick for hanging "hole less" curtains.....drapery rings.


They're so neat and make the curtains so easy to pull across the windows if needed.

There you have it....no sew and a very unique fabric choice.  The best part...the frugal aspect of this:
canvas drop cloths--$9.97 each (I searched...this really is a deal for curtains)
drapery rings--two packets of 7 at $4.96 each
Heat-n-Bond Ultra Hold--$2.17 and some left over
drapery rod (my least frugal find due to our wide window)--$31.88
Total cost:  $63.91

And with the scraps left over, I made a cutesy table runner to keep the similar pattern and texture in another room in the house:

Lay seam side up.


Measure to your desired taste.
Iron on adhesive on both long sides, creating a crisp hem on both long sides of the material.

And you've got a runner....love the "sandy" texture it adds to our "coastal meets country" style going on in our bungalow {yep, that's our own personal take on our style}.


What unique material have you used for projects around the house? Already using this amazing Heat-n-Bond stuff and haven't been in the dark as long as me? What projects have you created?
Be inspired!

p.s. to my sewing machine...no I have not forgotten you, and yes, I promise I still plan on bringing you out of the box.  It just takes a lot of bravery...something I haven't quite mustered up yet.  I'll get there.


Pin It!

3.26.2010

file cabinet makeover

See this beauty?


It's had a home in our office/"Boone's room" (as you can see from the crate in the background) since we moved in and has looked so pitiful the entire time.  It has glass stains....


And other nasty flaws....


But it's been hidden between our desk and Boone's crate...out of sight for the most part.  But definitely not out of mind for this "what else can I fix, organize, makeover, rearrange, or repurpose in our home" chick.  (And on this poor file cabinet's behalf, can I add it was free? I got it from my sweet grandma when she moved from her home to a nursing home.)

If you read my lovely little post here about my $3 Wal-Mart clearance contact paper, you know that I mentioned I had some ideas stirring already when I convinced myself to put this in my cart.  Well today was the day that I went into the office and just couldn't stand it anymore.  Anyone else get those spurts of home makeover energy? When it hits me, I jump on it.

So check out the process of our (less than) $3 file cabinet makeover with contact paper.  Yep, I said it.  Contact paper.

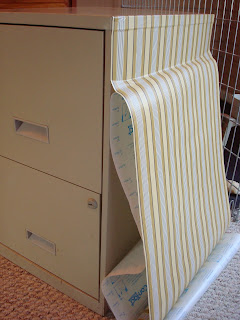
I started up one side first.  Key with this stuff...patience. 
See, even God can work through contact paper. 
He teaches me patience in just about every tiny moment of my life.
You want to get the corner started, and then peel away the backing slowly as you smooth out the bubbles or crinkles that appear.


I continued this process over the top of the file cabinet and down the other side.


I cut the bottom and then folded it under.  (Ignore that bubble there on the edge...I smoothed it out.  Plus, if you can't get it smoothed out, just use a little pin to puncture the bubble and it smoothes right out.)


You saw a glimpse of the still-ugly top and bottom parts of the file cabinet above.  (The parts above and below the drawers.)  To solve this problem, I measured those parts and then measured the area on the back of the contact paper so I could mark my measurements and cut them out to apply.


Once I applied those parts...you'll see that in a minute...I cut any overlapping contact paper in the back of the filing cabinet at the corners so that I could smooth the paper down onto the back surface of the filing cabinet.  (This part is always against a wall, so I didn't worry how neat it looked.)


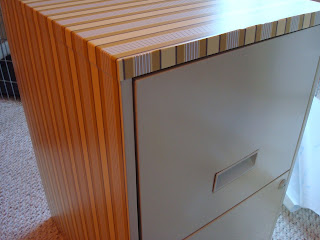
And the final project....


A closer look...


And tucked back all snug and cozy...and much more pleasing to the eye...between our desk and Boone's crate.  (I told him he now has "wallpaper" in a part of his crate.)


I love how this turned out. 
Thrifty? Check.  Aesthetically pleasing? Check. 
One more project off of my to-do list making me very happy? Check.

So now that I have a lot of contact paper left on this roll and I am so impressed by the actual tasteful look of the design, I'm wondering what other contact paper project ideas you have.  Have you ever used contact paper in a different sorta way? Do share!


Happy weekend!


Pin It!
Related Posts with Thumbnails