
See this beauty?

It's had a home in our office/"Boone's room" (as you can see from the crate in the background) since we moved in and has looked so pitiful the entire time. It has glass stains....

And other nasty flaws....

But it's been hidden between our desk and Boone's crate...out of sight for the most part. But definitely not out of mind for this "what else can I fix, organize, makeover, rearrange, or repurpose in our home" chick. (And on this poor file cabinet's behalf, can I add it was free? I got it from my sweet grandma when she moved from her home to a nursing home.)
If you read my lovely little post here about my $3 Wal-Mart clearance contact paper, you know that I mentioned I had some ideas stirring already when I convinced myself to put this in my cart. Well today was the day that I went into the office and just couldn't stand it anymore. Anyone else get those spurts of home makeover energy? When it hits me, I jump on it.
So check out the process of our (less than) $3 file cabinet makeover with contact paper. Yep, I said it. Contact paper.
I started up one side first. Key with this stuff...patience.
See, even God can work through contact paper.
He teaches me patience in just about every tiny moment of my life.
You want to get the corner started, and then peel away the backing slowly as you smooth out the bubbles or crinkles that appear.

I continued this process over the top of the file cabinet and down the other side.
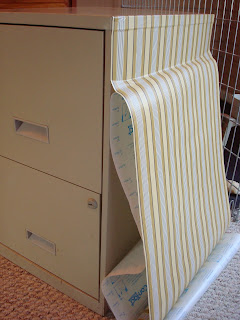
I cut the bottom and then folded it under. (Ignore that bubble there on the edge...I smoothed it out. Plus, if you can't get it smoothed out, just use a little pin to puncture the bubble and it smoothes right out.)

You saw a glimpse of the still-ugly top and bottom parts of the file cabinet above. (The parts above and below the drawers.) To solve this problem, I measured those parts and then measured the area on the back of the contact paper so I could mark my measurements and cut them out to apply.

Once I applied those parts...you'll see that in a minute...I cut any overlapping contact paper in the back of the filing cabinet at the corners so that I could smooth the paper down onto the back surface of the filing cabinet. (This part is always against a wall, so I didn't worry how neat it looked.)

And the final project....

A closer look...
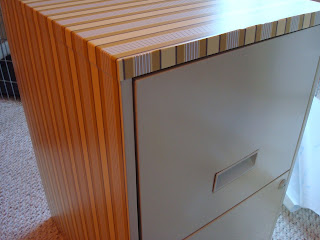
And tucked back all snug and cozy...and much more pleasing to the eye...between our desk and Boone's crate. (I told him he now has "wallpaper" in a part of his crate.)

I love how this turned out.
Thrifty? Check. Aesthetically pleasing? Check.
One more project off of my to-do list making me very happy? Check.
So now that I have a lot of contact paper left on this roll and I am so impressed by the actual tasteful look of the design, I'm wondering what other contact paper project ideas you have. Have you ever used contact paper in a different sorta way? Do share!
Happy weekend!


Wow, great job! You did great! :-)
ReplyDeletecute! Good job.
ReplyDeleteyou are one crafty gal! good work. we repurposed several things today for our baby girl's nursery - i love being thrifty! happy weekend.
ReplyDeleteThat is so smart and cute! I am definitely going to do that in the future with something like that!
ReplyDeleteHappy Sits Saturday Sharing!
ReplyDeleteGreat makeover!
I used a clear contact paper to add some decorative pizazz to one of my walls. I wanted it to be subtle, but different and that's what I got!
Just a suggestion; if you want to add pops of the stripe throughout the room, you could cover some cans to use as pen holders or cover cut cereal boxes to use as paper/ folder holders.
http://www.nbphotoalbum.com/image/file%20folder/FH106.jpg
www.lovemedaily.com
I'm loving the file cabinet!
ReplyDeleteIt's great what a simple makeover can do to a cabinet like that, right? The whole thing looks very organized, so good job with that filing cabinet!
ReplyDelete-Jackson Gaydosh
Cool blog post
ReplyDeleteWhere do you find fun contact paper? I found a few sites, but they are really pricey!
ReplyDelete