Showing posts with label crafts. Show all posts

3.08.2013

crafty streak

Lately, I've made sure to spend some time making my own personal art and doing some crafting.  Here's a glimpse.

rosette clip

jar with washi tape


canvas magnets

chalkboard paint frames


Pin It!

9.30.2012

gettin' crafty

It seems the craft projects just pile up and up while I can find very little time to actually create some of the crafts I so badly want to make.

However, I've had some time lately to actually create!

My first project was inspired by something I saw on Pinterest from this site. I recreated this with Adeline's sweet little hands and feet! I love that I have her handprints and footprints preserved in such a fun way!

I simply used canvases from Wal-Mart, tempera and acrylic paints, and "googly" eyes from Wal-Mart.

So simple and so fun!


My next project was inspired by the painted burlap signs you see. I LOVE the look of those but just couldn't get myself to spend the $30 or so dollars on one!

I've been wanting to create a fun birthday sign for Adeline's upcoming 1st birthday and to have one to hang on our front door each time we celebrate a birthday in our home!

For this project, I recycled an old burlap bag (or you can just use purchased burlap material).

1.  I sketched the outline of my design (a cupcake with icing) twice, in order to have two sides.

2. I cut my design out and pieced it together to make sure it matched.

3. Next, I used tempera (you can also use acrylic) paint to paint the icing white on top for each side of the cupcake. (Make sure to put the burlap over a lot of paper when painting...it leaks through.)

4.  I then painted stripes on each side (I did each side in different colors to have a more "girlie" side and a "boyish" side.)

5. Let the sides dry - this takes about half a day.

6. Use a Sharpie to write on and decorate as you wish.

7. Use a glue gun to glue the two sides together and secure wire for hanging. You will want to stuff the inside with newspaper.


I'm loving how this turned out too!!

A third project I wanted to accomplish was another idea I found on Pinterest.  I love, love having framed pictures in the house...but with as many pictures as I take of our family now and of Adeline by herself, I don't want to commit to placing a picture in a frame.  I would never get around to changing out the pictures! I loved the idea I found of have a clip within a frame to clip a picture and to easily change it out whenever.  I found a couple frames at Homegoods, used some canvas material I purchased at Wal-Mart (this is a textured fabric that we now have in a lot of places throughout our home!) and hung them above our new living room chair (that I adore!).


  I love the way it pulls the little nook all together!

Pin It!

10.02.2011

rosette fun

I've always loved the look of those sweet rosettes that flood the Pinterest tags and are all over the internet and craft world.  So with a baby girl on the way, I decided that this mommy-to-be must get moving creating some sweet rosettes, because I'm foreseeing lots of floral headbands in our future!

I started to create my first rosettes thinking I was going to make a headband, but then I remembered this "blah" lamp in the nursery that I have been trying to think of what to do to fancy it up.


So with my first rosette creation...this lamp now definitely has a new, more whimsical look.


If you haven't created a craft with rosettes yet, let me warn you, it becomes addicting! As soon as I did this project, I started thinking of all the other things I could do with these adorable fabric flowers...not to mention all the color combinations and vintage button combinations (I have en entire gallon-size bag) I'm planning for headbands!
My next creation was a headband for Adeline...


I used this tutorial that Emily shared with me and then made them my own a bit as I went.  So fun!


Pin It!

4.14.2011

spring fever

With the little bit of energy that I am starting to get back, I decided to do a quick craft project to help add some spring to our home.  I was excited to have all the necessary materials on hand!


I used chalkboard paint, a small, flat canvas and some ribbon I had in the closet.


I love how we can use this in the future to display within any wreath and write a message that relates to whatever is worth celebrating at the time!

What easy projects have you created lately? Aren't the simple, easy ones sometimes the best?

Pin It!

3.12.2011

change

I've always been a reflective person.  Whether it's as a Christian, as a wife, in my job, or in whatever other (many) roles I have, I seem to always have thoughts going on in my mind on how I can be better.  How I can change for the good.  So there are some things I'm working on changing right now...some I've been in the process of for a while...some I'm just now venturing into.  So here goes.  Any advice would be greatly appreciated!

{1}

That dreaded work-out routine. 

via
I mean really.  I have to do this.  For my heart, for my sanity, and to get toned. So how do you do it? I need tips.  I leave my house no later than 7 am M-F and don't return home until 4:30 three days out of the work week.  The other two, I go straight to grad class and don't get home until 8 (those days are over 12 hour days).  And as a teacher, it's not like I get nice lunch breaks where I can go walk...I'm lucky to make it with enough time to sit down and complete my lunch before picking up my kiddos again.  Trying not to complain...just being honest.  So how do I fit this in?

{2}

Finding healthy things to pack for lunch.

via
I'm beyond bored of turkey sandwiches on whole grain bread and regular salads.  Give me some tips...what are your healthy lunch go-tos for when you pack your lunch?

{3}

Giving up the soda, pop, Coke,
(or whatever you call it). 

via
  This is probably the one I'm doing the best with.  I haven't had a Diet Coke in I don't know how long, and honestly, I don't miss them.  (Never thought I'd say that!) But what I've figured out about myself, is that I crave the "fiziness" of a Coke sometimes.  What do you do to satisfy those cravings? Tips?

{4}

Making time to be creative (or do whatever hobby you enjoy).

via
 Plain and simple...how do you make yourself take time to relax and have time for your hobbies? I know with spring break and then summer break coming soon after, I'll have gobs of time (whoo hoo)! And for that I feel extremely blessed.  But how do you make time for this in your everyday, working life?

(and because I like to keep things in increments of 5...)

{5}

Quiet time.

via
I've explained before that I use my commuting time to be in silence and pray and listen to God.  That's been so crucial for my faith during the past few years.  What I'm not so great about is taking time to sit down, read my bible, and really study it.  It comes and goes in waves.  Where do you carve out time for this?

{One more thing...}

And a bonus question...do you all have cable? Is it worth it to keep it in the budget in your opinion? If so, what's your argument for keeping it around? If you've nixed it from the budget, or never had it in the budget, what was the deciding factor? For my sweet hubby, how does your hubby "survive" without it? This is one we're contemplating as a family...not sure what to do.

Whew.  That feels good to get off my chest! Maybe seeing it written down here will also help me with accountability.  Ladies...share your hearts out! And thanks in advance for any of your tips...y'all are huge inspirations in my life!
Happy weekend!

Pin It!

1.16.2011

are you sitting down?

via
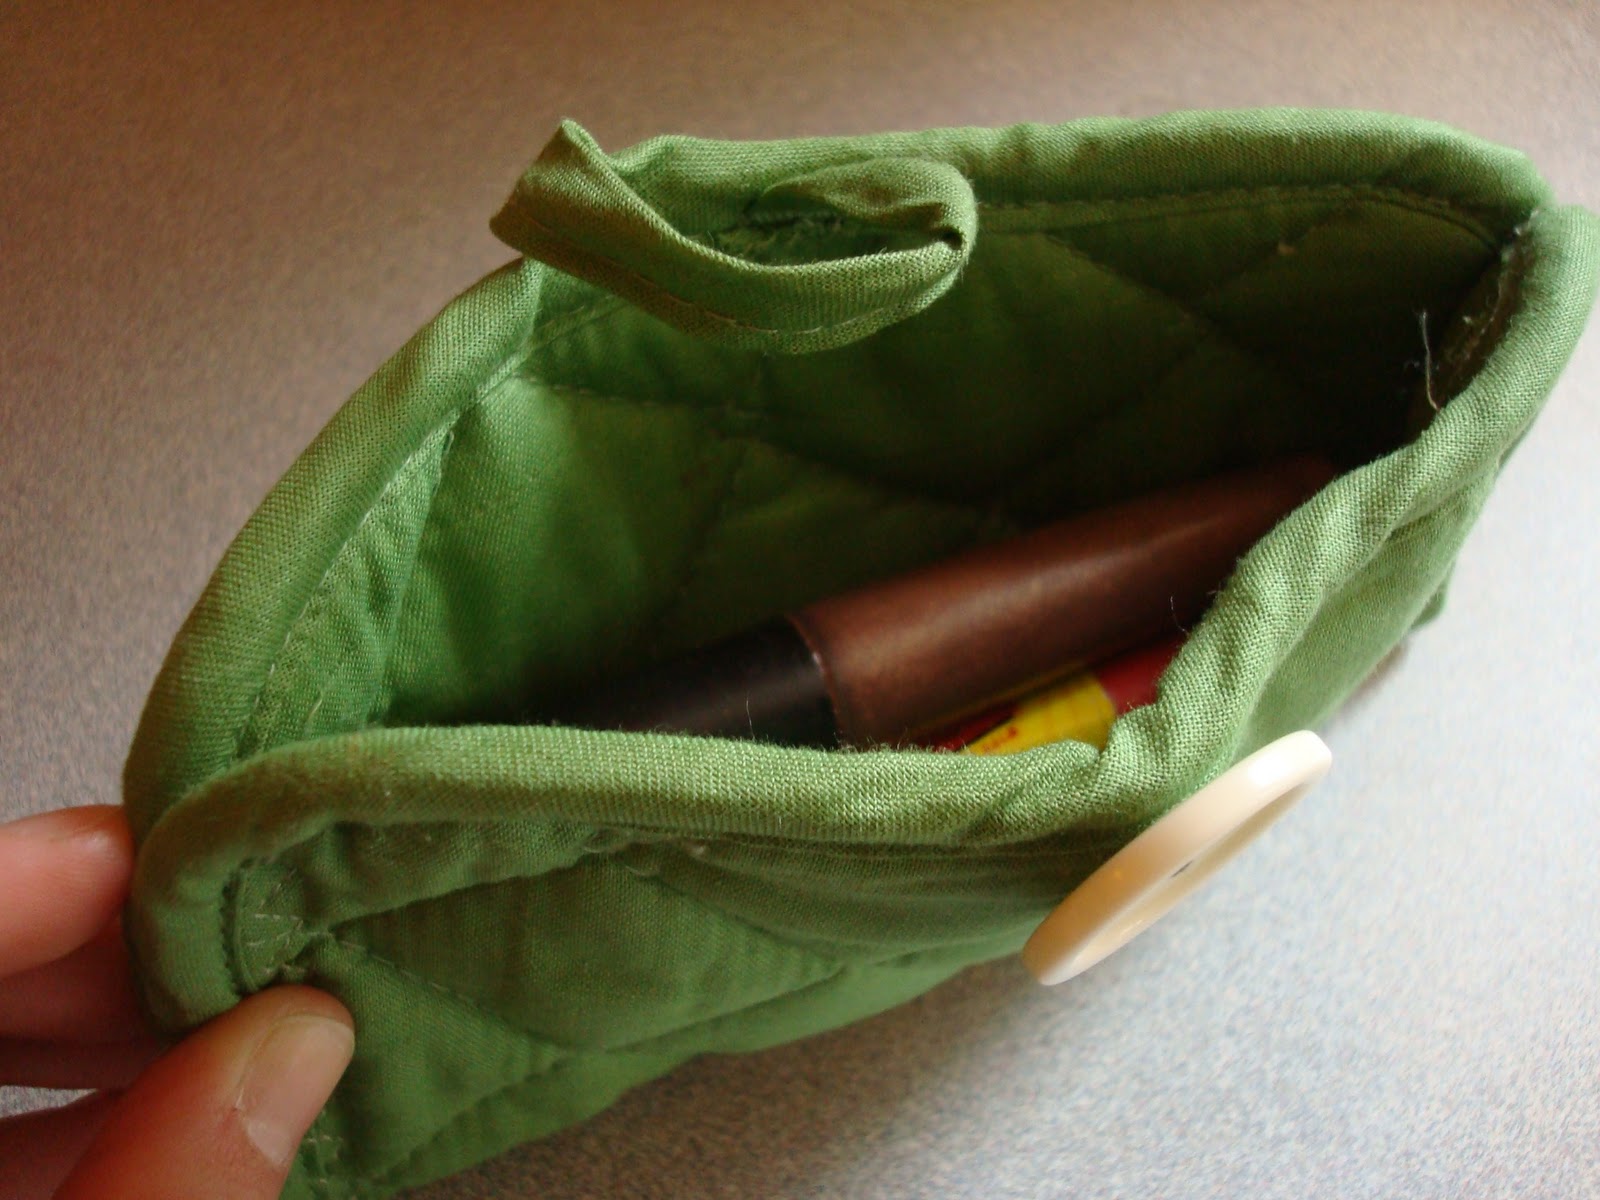
I finally broke out my sewing machine!! Oh yes.  That's what a three day weekend can motivate you to do! I'm excited to say that I actually used my sewing machine for the first time this weekend and even created something I love!

After a little lot of perseverance getting the machine ready to sew and ripping out a stitch or two lots of stitches, I finally had a breakthrough and had success with my first time sewing!

DIY Potholder Mini Makeup Bag

I started with a potholder.
(You can find them cheap at Wal-Mart for less than $2 for a two-pack.)


 I folded it in half and stitched up both sides with a zig-zag stitch.


I added a button that was left over from a piece of clothing.
(You know those extra ones you get and hardly ever use.)

And there you have it.  It's working beautifully to hold my lip stuff together in one place in my purse!

I'm so excited.  And I'm pretty sure I've caught the sewing bug!

So, do you sew? If "sew", what was your first project? Your favorite project?

Pin It!

12.09.2010

ribbons and paper and bows, oh my

Today's topic...

Wrapping Tips!

button


Grab the button and link-up for the fun!

First off, let me just say, I love to wrap.   If I could make a living out of it, I would.  It's just so fun to me.  It's like artwork.

Some of my tips....

-Recycle bags and bows from previous years.  This way, have lots to choose from and mix and match each year.  (This is also helpful on the budget.)

-Create your own tags from pretty card stock.

-Create personalized wrapping paper.  You can buy brown paper wrapping paper or plain white wrapper paper.  If you have kiddos, they can draw on it or using paint, you could have them add their hand prints (turn into reindeer) or fingerprints (make into snowmen).  If you don't have kiddos, you could glue black and white photos onto the paper or even use stamps to add pizazz.

-Use tissue paper to wrap. Lay a couple layers of tissue paper (different colors and/or patterns work well) flat.  Sit the item in the middle of the paper.  Bring up all sides and gather it at the top. Use a ribbon to secure the tissue paper at the top.  This works great for small trinkets!

-Wrap in a gift itself.  You could wrap in a tote bag, basket, or even a Rubbermaid container.

-Attach a trinket to the bow.  A small toy works great for kiddos or you could attach an ornament to packages for adults.

 So what are your favorite wrapping tips?

Tomorrow we're decking the halls!! Link-up your holiday decor!


Pin It!

8.08.2010

a sharp idea

When I did the file cabinet makeover using contact paper posted about here, a lovely reader gave me the idea of using some of the extra contact paper to make-over some office accessories.  What a sharp idea! A couple afternoons ago, I whipped up this little makeover for our pen and pencil holder.  (Mauve and green is good and all....but I just wasn't getting a good vibe from this accessory mixed with our freshly updated office.) 

So in about 5 minutes, I measured the length of the holder, cut the amount I needed, and slowly wrapped the holder while pulling the backing of the contact paper off as I went.


It's as simple as that! I still have some of this cute contact paper left.  Maybe I will cover Boone's crate in it next to match the rest of the office. ;)

Pin It!

2.26.2010

baby shower gift-wrap idea


I am going to a baby shower on Sunday for Justin's cousin's wife.  They are expecting a little girl.  Too sweet!  I get extremely carried away shopping for babies....little clothes, little shoes, fluffy blankets, adorable flower headbands, etc. etc. And may I add just two words....Baby GAP.  (Good thing I stayed away from that place when shopping.)  Oh my is my budget in trouble when I start dressing and buying for little ones of my own.

I had so much fun browsing the baby aisles in search for some fun "goody box" items.  I love putting together goody bags of lots of good stuff instead of buying one big gift.  I went into the store with the intention of finding something practical to wrap in.  This is "green" wrapping and provides something practical to help organize the nursery.  I found this adorable white box for $3 on clearance.  Love the price....more moolah for the baby gifts! I also found a cute pink blanket to line the basket.  I arranged all the goodies in the box, surrounded them with tissue paper, added a raffia bow...and wallah....a pretty twist on wrapping a baby shower gift. 

Doesn't the thought of a newborn just make you say, "awww".

Happy weekend...yay!


Pin It!

2.02.2010

Crafty Tuesday

A couple weekends ago I ventured into a little craft project that I saw in a crafting magazine.  Maybe it was my attempt to satisfy my first inkling of cravings for spring.  Whatever it was...it turned out pretty cute.

You need:  Fake moss grass, a sheet of scrapbooking paper, one foam cube, one fake flower of your choice, and a glue gun.  (Ignore the glue stick....didn't cut it.  Stick with the glue gun--no pun intended.)


Trace the largest part of your cube on the backside of your paper to get four squares.  (These will be larger then the four sides you cover.  That was an oops on my part...but you'll see how I made it work.)

Place some glue on the side and quickly apply a square of your paper.  Hot glue dries fast.

I kept one side of the paper flush with what will be the top of my flower cube.  I folded the other side under so that you can't see the foam at all when this is sitting on a surface.

The bottom should look similar to this once you have applied all sides of the paper.


Turn your cube back over to the side with the exposed foam.  Pull off a small amount of the fake grass.  Apply some hot glue in small sections and press the grass firmly to the surface.  (Don't worry about straggles of grass...we'll take care of this in a minute!)


Once you have covered the foam surface it should look similar to this.  (Can we say "bad hair day"?)

No worries! Give your cute little cube a "grass"cut.  I just snipped the excess off with scissors and it looked much better!

Next, take your flower and cut it to have about six inches of stem left.  For those of you that don't have wire cutters...like me....you can score it with regular scissors and then bend it back and forth to cut it apart. 

Stick the pretty little flower down through the grass on the cutesy little cube...and there you have it.  Your very own flower cube for your spring tastebuds!

Here it is adding a little spring to our nightstand in our guest bedroom. 

So there you have it! A very simple craft to satisfy those spring cravings.  The fun party of this is you can change the flower and/or paper type when you create these to fit any occassion....Spring, Summer, Fall or Winter...Christmas, Valentine's Day, etc.  (I think these would look adorable in a cluster of three cubes to decorate a little girls room and I'm already pondering how I can use fake poinsettias with Christmas paper to create cute Christmas decorations next year.)  Do share and let me know if you try this out! I would love to see your creations! Happy crafting!

I'm linking up....

blessings, Cait

Pin It!
Related Posts with Thumbnails